Instructions for firmware Antminer S9 (update)
Instructions for firmware Antminer S9 (update)
1. Which pools are suitable for overclocking
Today our firmware supports all pools with Asicboost:
Antpool: stratum+tcp://stratum.antpool.com:3333
F2pool: stratum+tcp://stratum.f2pool.com:3333
SLUSHPOOL : stratum+tcp://cn.stratum.slushpool.com:3333
BTC.COM : stratum+tcp://cn.ss.btc.com:1800
ETC…
2. Installing firmware and overclocking
2.1 To start you need to go to the mines’s admin panel, and then go to thepoints ”SYSTEM”—“UPGR DE”

2.2 Remove the checkmart from “Keep Settings”, click “Select file”
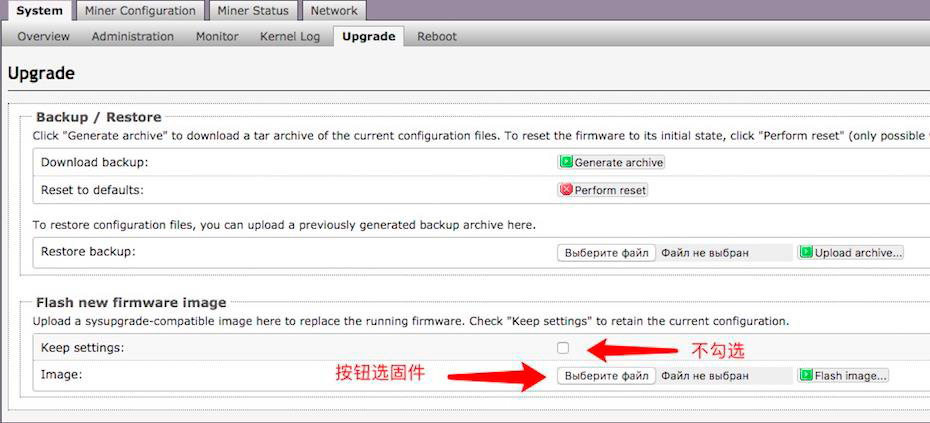
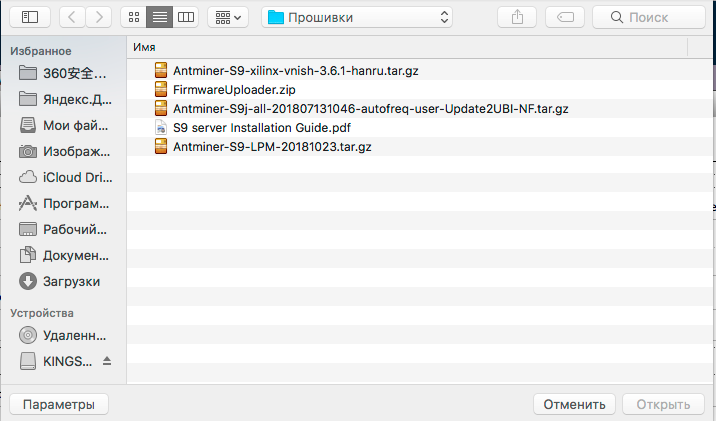
2.3 Select firmware file
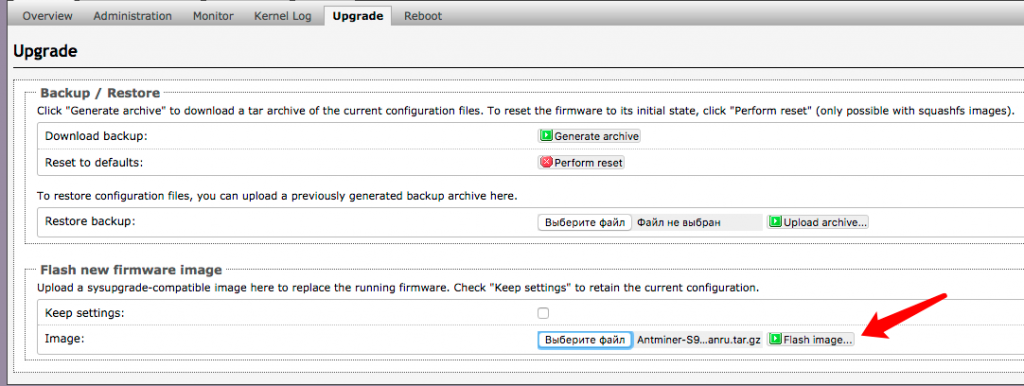
2.4 Press «Flash Image» and wait 120 seconds
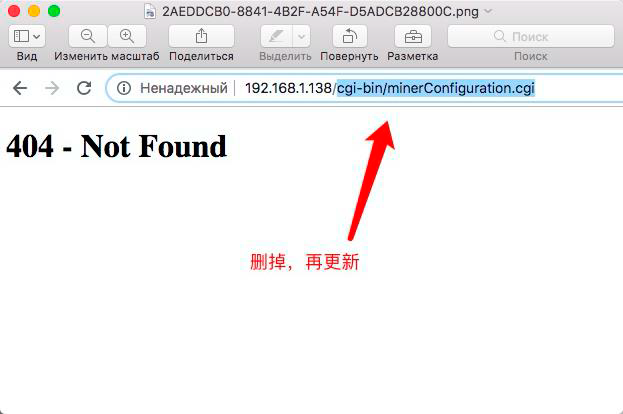
2.5 After downloading the firmware, when loading the admin panel, an error 404 can be appear, then leave only the device’s IP, delete everything else and click refresh the page (CTRL F5), example: 192.168.1.138/cgi-bin/miner, part CGI-bin / miner must be deleted, and the numbers 192.168.1.138 leave and press Enter
2.6 After the miner is loaded, go to the “MINER CONFIGURATION” and click “SAVE” to apply the new firmware settings.
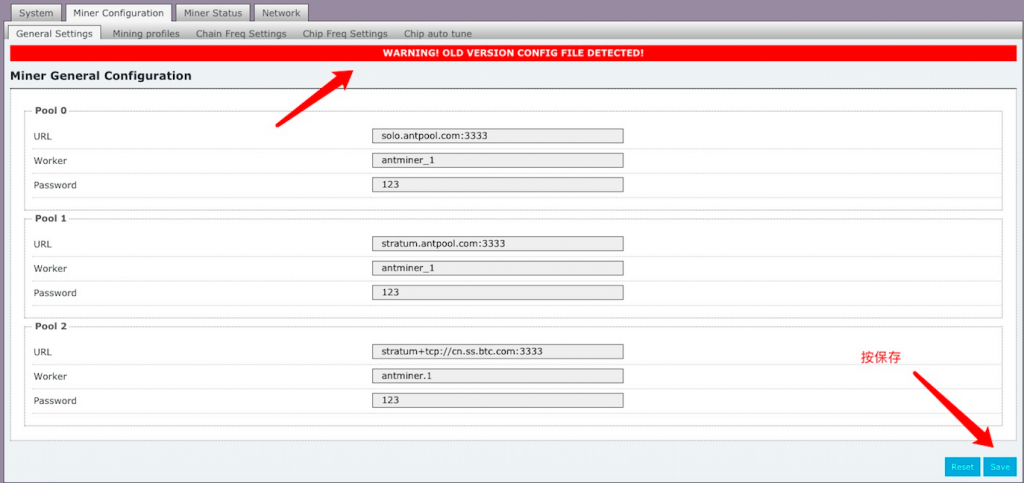
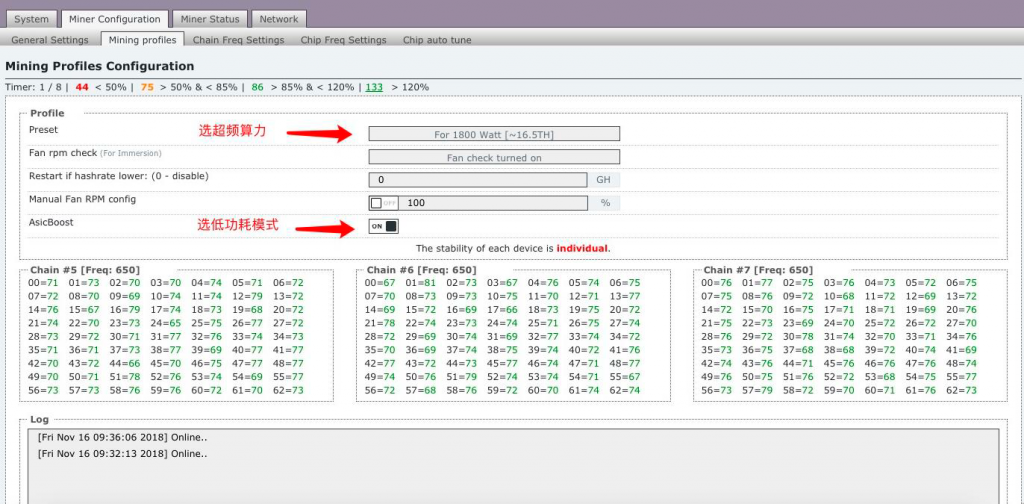
2.7 Further in the column “MINER CONFIGURATION” – “MINER PROFILES” you can adjust the
level of acceleration of ASIC, as well as apply other settings (optional) In the “PRESET” line,
it is necessary to select the level of overclocking , just select the “ASICBOOST” – ON
option to apply low-level power consumption. Click “SAVE” to apply the settings.
2.8 The provider blocks devfee and asic constantly reboots.New DevFee section, now everyone can choose the most suitable server for ping and stability.
After applying the settings, the asic needs
1.5 hours to automatically adjust the optimal
operation of the chips, during this period, the
asic will periodically reboot – this is normal!
Replacement of standard factory firmware @bitmain
on optimized firmware @crazy_mining
Crazy Mining firmware fits:
for all antminer T9+control boards
for all antminer S9, S9i, S9j Control boards except C5
- @asicfirmware – firmware support chat
- asic-firmware.com – firmware site
- @crazy_mining – chat about ASIC miners
- crazy-mining.ru – ASIC miners and hosting
The firmware uses AsicBoost
Devfee firmware – 2%
Recommended pools – btc, slushpool, antpool
FILES AND PROCEDURE
Firmware via the web interface of the miner:
1.Download the firmware update file cm_2.0:
— for Anrminer T9+ :
— for Antminer S9, S9i, S9j, S9k :
2. Go to the web interface of the miner, section System -> Upgrade, remove Keep Settings (do not save settings), select the downloaded firmware file (tar.gz), click Flash Image, wait for the update process to complete and restart the miner
3. Leave only the ip address of the miner in the browser bar, press Enter, then Ctrl-F5, go to the Miner Configuration menu and click Save (save new firmware settings), in the Miner Profiles section, select the desired mode, make other settings. The firmware for the S9 line of login: “root”, password “root@”
4. Now your ASIC has the latest version of Crazy Mining firmware. After applying the settings, the ASIC will enter the optimal operating mode for 1-1.5 hours, while its spontaneous restarts are allowed. If reboots continue and after, it is necessary to check temperature of hash boards and chips, to reduce frequency and tension. Critical (harmful) chip temperatures: T9+ – 90C, S9 – 135C, S9i – 85C, S9j – 95C.
Come to chat support: @asicfirmware
- If the ASIC miner behaves abnormally:
- before, during or after flashing
- does not connect, does not respond to IP address
- hangs, doesn’t load or disappear, the hash Board
- not flashed, froze, rebooted to finish
- the strange behavior of the firmware, virus
- firmware, but not updated
- SSH closed
- password does not match
- complains of Signature not found (recovery only)
Troubleshooting methods (by situation and complexity)
1. Find the IP address of the miner -video instructions and the program itself:
2. Completely de-energize the miner for 20 minutes, turn on again
3.Make a RESET of the control Board
4. Make RESTORE (Video 1 ) of the control Board
5. Make the RECOVERY of the control Board, if nothing helped, make the firmware via MicroSD, the instruction below:
Miner firmware via MicroSD (recovery)
1. Download the firmware update recovery file cm_2.0
— for Antminer T9+ :
— for Antminer S9, S9j, S9i, S9k :
2. Unzip the contents of the downloaded .zip archive on MicroSD, use special programme Rufes – 3.8. MicroSD card size should be no more than:
Rufus-3.8
- 4-8 GB for T9+
- 16 GB for S9, S9i, S9j
Larger cards may cause errors while flashing the control Board
3. Unplug the miner, unplug and unplug the control Board from power, hash boards, Ethernet completely
4. For Antminer T9+ you can flash any model of control Board.
5. If you have the line S9 from the control Board CRT0301, you’re prepared MicroSD card. Have CRT0301 no MicroSD slot.
6. Line S9 from the control Board C5 is also impossible to flash, this firmware is incompatible with the C5
7. If your control Board S9 says CRT0302., then for firmware via MicroSD you will need to close the pins on it, as shown in this photo
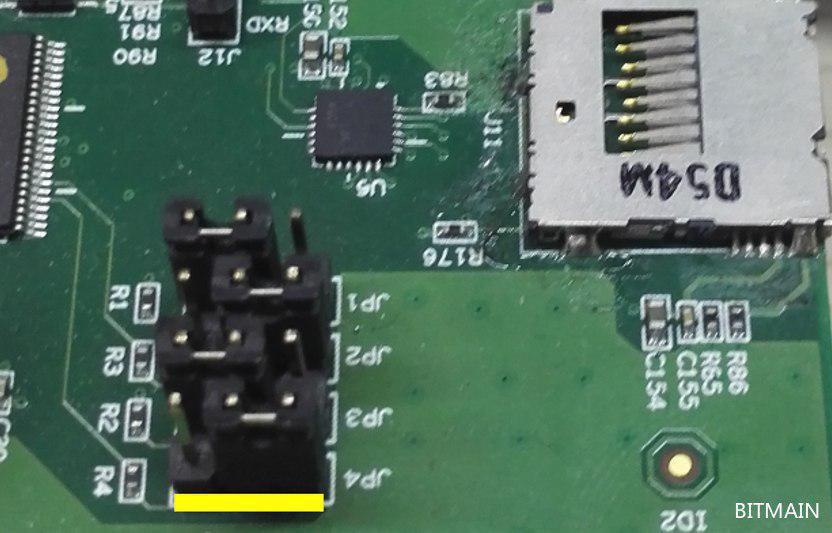
8. In all other cases, including all control boards T9+, and control boards S9, S9i, S9j, such as CRT0401, CRT0402 and many others (the practical majority of all ever released s9s), for firmware via MicroSD it is necessary to rearrange the jumpers:
— from such a position :
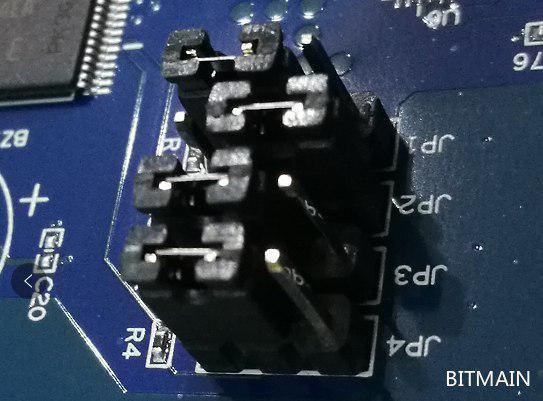
— here is in such position :
9. Now you can insert a MicroSD card into the control Board slot and connect the Board to the power supply. Make sure the card is inserted correctly – on some control boards the MicroSD slot may be upside down.
10. Wait for the red and green LEDs next to the Ethernet port to blink continuously. This will happen after about 60 seconds and will mean that the Board can be disconnected from the power – firmware via MicroSD is complete.
— after turning off the power, return the jumpers to their previous position and assemble the miner back
— this short video shows the whole process you just did when flashing your ASIC via MicroSD
11. Your control Board is completely cleared of old firmware and settings, it has the latest version of Crazy Mining firmware.
12. Return to step 3 to “Flash using the web interface” to configure the ASIC and to give him the opportunity to go to optimally mode. Specifically to paragraph 3 – more flash, and nothing else, with MicroSD you already put the latest firmware version @crazy_mining.
Attention!
Install version 3.8.6 when hashboards dissapears or work incorrect.
Come to chat support: @asicfirmware
